About 20 Testrides on my AMFLOW PX L (powered by my Partners and Local Bike Dealer Bike Bow in Hall in Tirol) are done – and overall, it’s a seriously impressive bike. More on the Ride characteristics, Motor, Battery Range etc coming soon.
This Article is about the first technical learnings, new findings added sequentially.
Note: Always check the AMFLOW PX Manual as well!
1. Fork Setup & Geometry
Unfortunately the OEM FOX 36 failed within the first two rides and is currently at FOX service (~5 weeks including shipping). An Air transfer issue was determined.
In the meantime, I tested a FOX 38 (170 mm) from my own stock, followed by another 36 (160 mm).
Interestingly, I actually prefer the 36.
It provides for a more balanced geometry. The 170 mm FOX 38 lifts the front noticeably – even after compensating with +0.5° and a lower BB. One can clearly feel that a 160 mm fork simply suits the bike better overall – but that is valid for our Innsbruck technical alpine riding – also known as Vertriding.
A 170 mm fork results in a slightly “stalky” ride characteristic.
The replacement 36 had a slightly too short cut steerer from back in the Days, which resulted in a lower cockpit than intended. Surprisingly, it works – especially in steep terrain and tight switchbacks, where the compact stack delivers very direct front-end control.
For fine-tuning until the original fork returns and to reduce strain on my neck and shoulders I’ve switched to a handlebar with 50 mm Rise.
-

- Weight of out of the Box AMFLOW PX Stock L
-

- Weight Newly Assembled AMFLOW PX Stock L
-

- AMFLOW PXnew Size L
-

- The MDR-S 200 front with the Hall Sensor Cutouts
-

- The MDR-S 200 front with the Hall Sensor Cutouts
-

- Gustav Pro works well with MDR-P 220
-

- AMFLOW PX with FOX 36 Lower Riser Bar
-

- AMFLOW PX with FOX 36 Higher Riser Bar
-

- AMFLOW PX with FOX 36 Higher Riser Bar
2. Issues big and small
a) Upper 0° Standard Headset Cup Play
With correct headset preload, the original 0° upper headset cup (5) shows slight play under full load.
With the front brake applied, one can both feel and visually detect minimal forward movement of the standard 0° headset cup inside the head tube and see the Top Cover (1) move back and forth slightly. Hhm.
This definitely needs a proper solution.
Current workaround:
Using the +0.5° headset cup included in the accessory box solves the issue. Due to its integrated rectangular guiding block design at the Cup sleeve, it fits snugly into the frame and does not exhibit any movement.
I measured the cup insertion sleeve diameter on both the standard 0° headset cup and the alternative cups. The sleeve diameter is identical across all cups at least with the analog measure.
However, the completely round standard 0° headset cup tends to tilt slightly inside the carbon head tubes as it is not pressed in.
So obviously it does not provide sufficient friction or contact surface with the headtube, as it is not press-fit but simply placed (by Hand) into the head tube.
One can also clearly notice that the standard 0° cup can be easily placed into and removed from the head tube by hand.
In contrast, the alternative headset cups require significantly more force to install and can be removed by hand, but with a lot of effort and finger and nails twitching. Their rectangular guiding block extension increases surface contact and friction with the frame and ensures proper alignment along the frame’s central axis, effectively preventing any movement.
-

- The Headset Assembly
-

- the Standard cup does not use the rectangular frame interface
-

- Standard Cup vs…
-

- Alternative Headset Cup seen from above
b) Power Extension Cable of the SRAM Derailleur
The Power Extension cable of the SRAM derailleur has relatively free movement where it exits the chainstay and is prone to getting caught by branches or similar obstacles.
A simple fix with a bit of Tesa duct tape works well.
A zip tie is not effective here, as the trapezoidal shape of the chainstay – especially where it meets the seatstay at the Horst link – causes the zip tie to slide toward the Horst link, where it doesn’t belong and get’s loose.
-

- Loose Cable
-

- Cable fixed with Tesa Duct Tape
-

- It’s called the Power Extension Cable (5)
c) Dust and Dirt entering the Lower Headset / Crown Race Gap
The lower headset, bearing, and crown race are not very well protected against dust and dirt ingress. I really noticed this while changing the forks from the OEM 36, to 38 and to my old Aftermarket 36…
The Images show the Fork lowered a bit to show the Gap.
On many other bikes, there is typically a dust seal integrated at the crown race interface toward the frame and lower headset bearing. This is not the case on the PX (and also not on the PL).
-

- Dust Entry
-

- Dust and Dirt under the lower Headset Bearing
-

- Dust and Dirt under the lower Headset Bearing
-

- Here’s the Gap where Dust enters…
d) Steerer Stop Block Replacement
For those who remove the standard steerer stop block which is required by Law in certain countries for accident prevention, a proper replacement part is currently missing. Since the Times of the early PL’s users are solving this with a 3D-printed part (Cults 3D Block Replacement). While this is a nice DIY workaround, a dedicated replacement part could ideally be included with the bike. As well as an AirTag Holder maybe 🙂 (Air Tag Holder FOX 36 AMFLOW PL)…
-

- Steerer Stop Block removed and Tabe applied to fill the Gap
-

- Steerer Stop Block removed directly on Trailside at the first ride
-

- Steerer Stop Block (6)
-
- The Headset Assembly
e) SRAM AXS Pod Controller – Ergonomics Limitation with Gustav Pro
The SRAM AXS Pod Controller itself is a well-designed unit, offering excellent ergonomics, intuitive “click and fire” operation, and full customization via the AXS app.
However, in combination with the Magura Gustav Pro brake, there is a notable limitation:
The clamp of the AXS Pod cannot be positioned far enough inward (to the left on the right-hand side of the bar), as it is physically blocked by both the shape of the Gustav Pro brake clamp and the reservoir of the radial brake lever.
As a result, the Pod sits slightly too far outward, causing the rider’s right thumb to repeatedly contact the controller during riding. This becomes noticeable and uncomfortable, especially on longer or more technical descents.
This is clearly a compatibility issue between the two components rather than a flaw of the Pod itself.
-

- The AXS Pod and it’s OEM Mount
-

- Thumb hitting the Pod
-

- Gustav Pro limits the Pod Mount
f) Chainstay Protector – Functional but Overbuilt Edge
The chainstay protector itself is well designed in terms of coverage and protection. However, due to its material thickness, it adds noticeable bulk to the chainstay and features a relatively high, pronounced outer edge.
When repositioning the rear wheel during tight switchback riding I give the chainstay a quick impulse with my left or right feet instead of rotating the bike with the hips – I noticed that it is quite easy to catch the left shoe on that edge when I du left hand switchbacks.
This can be slightly disruptive in technical terrain and tight maneuvers.
Additionally, I have some concerns that the protector could lose adhesion over time in this specific area, as the exposed edge is likely subjected to repeated mechanical contact and stress. So I will apply the best solution there is: the 3M Scotch Rubber Mastix Electric Tape 2228, 5,1 cm x 3 m, black, which is a self sealing tape for Isolation and Seals, which softens that sharp edge a bit.
-

- The Protectors protruding Edge
-

- The Protectors protruding Edge
g) Front Hub Seal – Loose Fit (Left Side, Direction of Travel)
The sealing ring of the front hub on the left side (in direction of travel), located above the hub bearing, tends to come loose repeatedly.
During wheel removal and installation, it can easily shift out of position, which raises concerns about it potentially being lost over time.
This should ideally have a more secure fit to ensure proper sealing and long-term reliability.
-

- The Front Hub Seal
h) Rear Hub Freehub Standard – Shimano HG vs. SRAM XD Compatibility / 4-Pawl vs 6-Pawl long term durability
The rear hub is equipped with a Shimano HG-style freehub body (4-pawl system).
The bike comes with a SRAM XS-1270 Eagle Transmission cassette (10–52T), which is specifically designed to be compatible with traditional splined freehub bodies (Shimano HG standard). It is a full steel cassette, which is a clear advantage in terms of durability — especially for the heavily used 52T granny gear in alpine terrain.
While the XS-1270 is noticeably heavier than its aluminium counterparts, the full steel construction results in significantly improved longevity and wear resistance under real-world riding conditions.
According to SRAM specifications, the XS-1270 cassette fits:
- directly on standard 8/9/10-speed HG freehub bodies
- on 11-speed HG bodies with an additional 1.85 mm spacer
- https://support.sram.com/hc/en-us/articles/26988415305243-What-driver-body-is-the-XS-1270-Eagle-Transmission-cassette-compatible-with
The stock wheelsets (XMA-30 mullet version) use the following configuration:
- 12 × 148 mm rear hub
- 32H
- 4 pawls / 36T engagement
- HG freehub body
Unfortunately, the XMA-30 only features a 4-pawl system, whereas the PX Pro’s XMC-30 version comes with a 6-pawl hub.
As a result, the stock setup on the Amflow PX and PR does not support SRAM XD-compatible Transmission cassettes. Switching to an XD-based cassette therefore requires replacing the freehub body (if available) or the complete rear hub/wheel. Guys, thanks for nothing!
More critically, the reduced pawl count results in less direct engagement and raises valid concerns regarding long-term durability. Given the torque characteristics of the M2S motor (up to 150 Nm), a more robust engagement system would be expected. A 4-pawl setup appears underbuilt for this application, especially under repeated high-load conditions typical for alpine riding.
This is not just theoretical – in technical terrain, the slower engagement vs the PL Pro Rear Wheel is noticeable, and from a mechanical perspective, higher load per pawl will accelerate wear over time, and we are talking about 150 NM max. + Rider input.
See: AMFLOW PX Tech Specs
i) Flip Chip Orientation – Reduced Clarity on PX vs. PL
On the previous PL model, the flip chip orientation for 27.5” vs. 29” was clearly visible and intuitive.
On the PX, this has become less obvious due to the new flip chip plate design. The geometry and shape of the plate make it difficult to immediately identify the correct orientation.
The small engraved pictograms provide some guidance, but in practice they are not sufficiently clear or intuitive.
It works a bit better if you have this little Sheet ready from the AMFLOW PX Manual:
-

- AMFLOW PX Flip-Chip Settings
As a result, determining the correct setting requires closer inspection than it should, especially in workshop or trail-side conditions.
Adding to the confusion, the accessory box appears to include replacement flip chips intended for the PR model, which are not relevant for the PX setup. Please correct me if I’m wrong…
-

- The PL Flip Chip was visually pretty clear, here in the 29″ Setting
-

- The New PX Flip Chip is not so easy to distinguish in it’s setting
-

- New Flip Chip on 27.5″ Setting
-

- New Flip Chip on 29″ Setting
j) Avinox Spider Lockring Tool – Lack of Axle Retention
The Avinox lockring tool for the spider lockring lacks any form of retention or guidance on the crank axle.
Unlike well-designed solutions such as the Cyclus tool for Bosch Gen4 lockrings, which is securely threaded onto the crank axle first and then bump proof Spring Locked, the Avinox tool is not fixed in place during use.
With the Cyclus system, the tool is screwed into the crank axle thread, creating a solid and centered interface. It is then guided onto the lockring via a snap-in mechanism. This ensures perfect alignment and allows safe one-handed operation without any risk of slipping.
In contrast, the Avinox tool relies purely on manual positioning and pressure probably by your Body leaning on it from the side. Especially when operated one-handed, there is a constant risk of the tool slipping off the lockring.
This is particularly critical given that:
- the required torque is relatively high (~20 Nm)
- the lockring is made of aluminum rather than steel
A slip under these conditions can easily damage the lockring.
From a mechanical and usability perspective, this is a clear design weakness. A guided, axle-supported tool interface – similar to the Cyclus Tools solution – would significantly improve safety, handling, and reliability during installation and removal.
The Spider and Lockring are found here:
AMFLOW Lockring Tool and Spider Kit -> this Kit makes Sense as you get a spare Lockring too
-

- The Avinox Spider Lockring and the Tool
-

- Cyclus Tools Bosch Tool with Safety Retention
-

- Cyclus Tools Bosch Tool with Safety Retention
-

- Hello Spider and Tool…
k) Lower Headset O-Ring – Seal Damage and Insufficient Retention
The lower headset assembly consists of the bearing (9), the lower headset cup (8), and the lower bearing seal (7).
In practice, the seal (7) is not a properly retained sealing element but rather a very thin O-ring that is simply rolled onto or loosely placed over the lower headset cup (8).
The complete assembly (9 → 8 → 7) is then inserted into the head tube from below.
During installation, the O-ring frequently shifts out of position, rolls off, or can even be damaged. It lacks any defined seat or retention feature and does not stay securely in place.
The fit is noticeably loose, and the sealing concept appears under-engineered for a component that is directly exposed to water, dust, and contamination from the front wheel.
From a mechanical and serviceability standpoint, this solution is inadequate. A properly guided and tensioned seal – ideally integrated into the headset cup or designed with a defined groove and interference fit – would significantly improve reliability, sealing performance, and ease of installation.
We found a better retenting O-Ring which fits in a Bosch Gen4 Box in the Bike Bow Workshop, see Image 2, the smaller one on the left side of the broken original one.
-
- The Headset Assembly
-

- Lower Headset O-Ring Damage
l) Chainring Size vs. Chainstay Clearance
When running a 32T front chainring, the chain passes extremely close to the chainstay protector when in the smallest rear cog (10T on the 10–52 cassette).
With a 34T chainring, the clearance improves slightly but remains tight.
This should be taken into consideration, as the minimal clearance could lead to contact under load, flex, or contamination (mud/debris), especially in real-world riding conditions.
BTW at first with the 32T Chainring, the Transmission Chain seems to pass by the Spider super duper close. But it works without any Problems.
PS: Why do we run 32T front on eMTBs in Tyrol? Because we ride the steepest, gnarliest, most technical stuff Uphills worldwide. from 30%-50%+ trails.
So basically, we run 32T front for a reason, no Joke. But I can understand you wondering if you come from the Netherlands 🙂
-

- 32T
-

- 34T
-

- 32T
-

- 32T
-

- Uh that looks close
-

- Changing to 32T
-

- Looks super close but works with 32T
-

- Looks super close but works with 32T
-
- Hello Spider and Tool…
3. Drivetrain efficiency Adjustment
After the first steep uphill ride, I immediately swapped the front SRAM Avinox Direct Mount chainring from 38T to 34T, and more recently to 32T.
The 38T clearly hurts efficiency and range (approx. -30% in my use case). For alpine riding, a smaller chainring – such as 32T – is the only logical choice.
4. Gustav Pro Brake Performance Upgrade
The Magura Gustav Pro required an upgrade. The 203 mm MDR-S rotor was for me not powerful enough, so I moved to a 220 mm MDR-P setup, which is officially supported by Magura.
Current upgrade path:
- Pads: MDP 13 BLACK → SILVER (+15% bite) or YELLOW (more power)
- Rotor size: 203 → 220 mm
- Rotor type: MDR-P 220 mm (2.0 mm, plug & play)
- Future: MDR-S 220 mm (2.5 mm) for improved heat management and more precise braking while maintaining good modulation
-

- Gustav Pro works well with MDR-P 220
-

- The MDR-S with the Hall Sensor Cutouts
-
- The MDR-S 200 front with the Hall Sensor Cutouts
-
- The MDR-S 200 front with the Hall Sensor Cutouts
-
- Gustav Pro works well with MDR-P 220
-

- Gustav Pro works well with MDR-P 220
5. Seatpost
Next change will be the seatpost – likely FOX Transfer 200 or OneUp. The Original Seatpost moves a bit slowly and also needs Lubrication.
I need maximum drop for very steep terrain with large root step-downs. The OEM post still has a bit too much stack while it is an improvement to the 2025 PL’s stock seatpost.
In our riding terrain, even a 10 mm lower saddle height makes a noticeable difference.
Also: Big thanks for the short seat tubes on the PL and PR – this is highly appreciated in the Alpine rider community!!
-

- Lube me! I like that…
6. Chainstay Setting
I set the chainstay to maximum length (with 27.5″ rear), which noticeably improves climbing performance!
7. Battery & System Performance
With the 700 Wh battery:
- ~10–15% less total elevation capacity compared to the PL
- Battery runs ~5°C cooler
- Motor also slightly cooler and extremely quiet
- 32T front helps to have the M2S on optimum efficiency on steeper climbs
9. Update Works April 26, 2026
a) Protection added to the Chainstay
Using the Scotch 2228 Rubber Mastic Tape I added protection to the Chainstay and fixed my Shoe scrapping the edge.
-

- The Chainstay Protection coming off towards the Motor Side.
-

- Scotch 2228 Rubber Mastic Tape fixes everything!
-

- I pressed this little bugger that had come loose back in
-

- Fitting work
-

- Fitting Work
-

- Completed
b) Avinox Routing Bug
-

- Imported track in Avinox Navigation
-

- Overview
-

- Incorrect direction detected – route greyed out despite following the original GPX track
-

- Incorrect direction detected – route greyed out despite following the original GPX track
-

- Incorrect direction detected – route greyed out despite following the original GPX track
-

- Correct direction – route shown in green
-

- Incorrect direction detected – route greyed out despite following the original GPX track
The new Avinox routing based on Komoot / GPX import is generally well implemented. However, as I have also observed with the Bosch Flow App, it does not reliably interpret the original riding direction of GPX tracks exported from Outdooractive.
For example, a trail recorded and ridden counterclockwise is imported correctly as a GPX track. But when riding the same trail again in that exact counterclockwise direction, Avinox displays the route as greyed out instead of green.
In the Avinox interface, green indicates that the rider is following the route in the expected direction, while grey suggests a direction mismatch. In this case, the system appears to interpret the track direction incorrectly, even though the rider is following the original recorded GPX track direction.
The same issue also occurs with planned routes. Tracks created in a defined direction (clockwise or counterclockwise) are not consistently recognized as such after import, and Avinox may again indicate a direction mismatch when riding them as intended.
Although the GPX track is greyed out, it remains visible and usable as a reference. However, correct direction recognition is essential for reliable navigation and proper route guidance.
For privacy and legal reasons, certain location-specific details (such as grit information) have been removed or obscured in the example images, as many of the trails I ride in Austria are not officially designated for mountain biking.
c) Finally: Bike updated to Rock Shox Lyrik Ultimate with Charger 3.1 RC2, Butter Cups
-

- MY2025 Lyrik Ultimate
-

- MY2025 Lyrik Ultimate
-

- MY2025 Lyrik Ultimate
-

- The green fork blends surprisingly well into the environment 🙂
On Willhaben, the Austrian equivalent of eBay, I found a brand-new, out-of-the-box MY2025 Lyrik Ultimate and went for it. The improvement on the trail is significant.
The Lyrik is noticeably more forgiving on my wrists, especially with the ButterCups, which makes a big difference on longer and rougher rides. Comfort and front-end control have improved considerably, and the fork adds a much more composed and predictable feel to the bike.
And yes — the green might not be for everyone, but it blends surprisingly well with the overall look.
So it’s goodbye to the orange FOX 36 – which, to be fair, matched the black AMFLOW frame very well. Let’s give it one last moment here. That said, I’m genuinely relieved to now run a fork like the Lyrik Ultimate, which simply performs on a different excellent level.


d) Upper 0° Standard Headset Cup Play – confirmed on another AMFLOW PX
The play in the upper 0° standard headset cup, as mentioned in section 2 a), could be confirmed on another AMFLOW PX (size XL) that I came across by chance in a shop in South Tyrol, just before delivery to the customer.
The bike was brand new, professionally assembled, and ready for handover. The shop mechanic was initially surprised, but was able to confirm the same observation after checking it more closely. I suggested switching from the standard 0° cup to a +0.5° version, which should resolve the issue. How this is ultimately communicated to the customer is up to the shop.
It is worth noting that the issue is extremely subtle and would likely have gone unnoticed without specifically checking for it. With the index finger and thumb placed on the upper headset cup, a slight amount of play can be felt under firm front brake load.
-

- AMFLOW PX XL in South Tyrol, ready for handover to its new owner
e) 870 g Saved – What the PL Pro Carbon Wheels would change
First a Wheelset overview:
- AMFLOW PL Carbon – HMA-30 wheelset, Aluminium
- AMFLOW PL Pro Carbon – HMC-30 wheelset, Carbon
- AMFLOW PX Carbon – XMA-30 wheelset (mullet), Aluminium
- AMFLOW PX Carbon Pro – XMC-30 wheelset (mullet), Carbon
- AMFLOW PR Carbon – XMA-30 wheelset (mullet), Aluminium
- AMFLOW PR Carbon Pro – XMA-30 wheelset (mullet), Aluminium
For comparison, I took the opportunity at Bikebow to install the original AMFLOW PL Pro Carbon wheelset (HMC-30) into the AMFLOW PX Carbon to evaluate the impact on overall bike weight.
-

- PX with XMA-30 wheelset (mullet)
-

- PX with XMA-30 wheelset (mullet)
21.55 kg
MY2026 RockShox Lyrik Ultimate 29” / 160 mm (Charger 3.1 RC2, ButterCups), Original AMFLOW PX wheelset
-

- PX with HMC-30 wheelset
-

- PX with HMC-30 wheelset
20.69 kg
MY2026 RockShox Lyrik Ultimate 29” / 160 mm (Charger 3.1 RC2, ButterCups)
AMFLOW PL Pro Carbon wheelset (HMC-30)
Difference
Approx. 870 g
This is a substantial reduction, especially considering that most of the weight saving comes from the wheelset — i.e. rotating mass. The effect is clearly noticeable on the trail, particularly in terms of acceleration, responsiveness and overall handling.
For reference, BIKE Magazine measured the AMFLOW PL Pro Carbon HMC-30 wheelset at 5116 g, which puts the observed weight difference into context.
-

- © Bike Magazine Germany
Additional details to my PX Bikes setup for Weight:
Pedals
DMR Vault Brendog flat pedals – 430 g
Tires
Front: 29” x 2.4” Continental Kryptotal Fr, Enduro Soft, Folding Skin SL (60-622)
Rear: 27.5” x 2.4” Continental Kryptotal Re, DH Casing Soft (65-584)
Tubes: Schwalbe SF19 (27.5”/29”)
Cockpit
Handlebar: SQLab 3OX aluminium, 780 mm, 45 mm rise, 4 mm upsweep, 12 mm backsweep
Stem: Newmen 45 mm
f) A bit of a heat built!
I recently stressed the M2S and the FS700 Battery on a 20°C Day on a 1000 HM ascent, one of our Magazine Test Hillclimbs over the Years where many Motors and Batteries have derated after 20 Minutes. Not so the Avinox: Full power, 1500W 130NM. Impressive results. Motor and Battery did not overheat.
-

- Warm but not overheating.
-

- Stopped only by Avalanche remains
g) Dialing in BB Height – Why I Run the PX in 29” Flip Chip Mode with a 27.5” Rear Wheel
-

- 27.5” rear wheel run in 29” flip chip mode to lower BB height
-
- AMFLOW PX Flip-Chip Settings
-

- Enough Saddle to Tire clearance
While I generally prefer a higher bottom bracket to reduce pedal strikes and avoid sudden crashes (been there, done that), the AMFLOW PX sits on the higher side with a BB height of 349.5 mm.
This results in a noticeably elevated center of gravity, which becomes particularly apparent on steep descents and in cornering, where the bike can feel slightly “on top of the trail” rather than deeply planted.
This effect is further amplified when increasing front-end height – for example by running a 170 mm fork, which did not work for me for that exact reason.
For this reason, I chose a somewhat unconventional setup: running the stock 27.5” rear wheel, but setting the flip chip to the 29” position to lower the bike further. I also run the long chainstay setting, which contributes an additional ~3 mm drop.
On bikes without bottom bracket height compensation via a flip chip at the swing link / rocker arm, a mullet setup would naturally lower the bottom bracket due to the smaller 27.5” rear wheel. However, the PX compensates specifically for this via its BB height flip chip system. As a result, in the standard 27.5” setting, the bike maintains its intended bottom bracket height – which is already on the higher side.
By selecting the 29” flip chip position instead, the rear end is effectively lowered beyond the intended compensation, bringing the bottom bracket down and slightly reducing the center of gravity.
It is worth noting that the PX offers multiple independent geometry adjustment options: bottom bracket height via flip chip, chainstay length adjustment, and different headset cups to alter head angle. In this case, the BB height adjustment is the key factor.
The result is a more grounded and composed ride feel, especially in steep terrain and during aggressive cornering.
If I expect a full day with repeated sections of very rocky or exposed terrain, I will switch back to the “27.5 – high” setting to gain additional pedal clearance and avoid pedal strikes altogether.
This setup aligns well with my riding preferences and shows how fine-tuning geometry over time – even against standard recommendations – can significantly improve real-world performance.
h) Miscellaneous
A few additional changes and observations since April are summarized in the gallery below.
-

- I removed the right Controller, as sometimes shifting at the Pod will hit the Controller too. Also, I have mapped Start Stop Recording of the OSMO 360 to the Top Button of the left controller. I don’t need the Boost Button.
-

- Fully rounded frame surfaces – no flat interfaces for attaching a GoPro mount.
-

- Unlike many dropper posts using tiny Torx or 4 mm Allen bolts, the AMFLOW post uses a proper 5 mm interface – much easier to work with, especially with a classic 5 mm Syntace Allen key. The front bolt is also perfectly angled for easy access.
-

- Switched back from the recently installed 27.5” x 2.4” Kryptotal (Soft) to a 27.5” x 2.6” Kryptotal (standard compound) for improved rear traction. Mounted in reverse rotation direction to maximize drive grip.
-

- The PX is a true expedition machine – like a V8 Jeep, it powers through mud, snow and deep terrain with ease.
-

- In slushy snow, I had to remove the front fender, as buildup between the tire and fender can quickly block the wheel.
-

- In slushy snow, I had to remove the front fender, as buildup between the tire and fender can quickly block the wheel.
-

- AXS Update done.
-

- The first nerd who makes the Bosch 250 Wh Powermore compatible with Avinox deserves a Nobel Prize.
10. Wanted! Compact Range Extender – VoC!!
Avinox please listen: For the upcoming big mountain season (September/October), my biggest wish to Avinox is a 250–300 Wh bottle-style range extender, ideally backpack-compatible.
Form factor similar to:
- Bosch 250 Wh PowerMore
- Specialized range extender
An ideal PX Range Extender solution would include:
- Bottle-style RE (250–300 Wh)
- Simultaneous use of main battery + RE
- Hot-swap capability (replace depleted RE mid-ride)
The current RS 600 Wh strap-on solution is:
- Too bulky
- Awkward
- Not compatible with size L PX
- RS 600 will feel heavy in the Backpack
-

- Is this the new compact Range Extender for the Backpack?
a) Real-World Reference Setup (Simplon Rapcon CX)
For the Bike Test see here: One Bike – Three different Motors – E-Mountainbike Magazine
Previously over 400.000 HM and 6500 km, I used a very flexible system on my Simplon Rapcon CX which is now my Touring bike 🙂
- Swappable main battery: 750 Wh or 500 Wh
- 250 Wh Bosch PowerMore on the frame
- plus 250 Wh Bosch PowerMore in the backpack for the super Gnarly +2500 HM ascent rides
The 250 Wh unit (~1.4 kg) was perfectly acceptable in my backpack, it is small and weighs around 1.45 kgs. Barely noticeable.
This allowed:
- On-the-fly swapping of the downtube RE with a fresh one from the backpack
- Ideal flexibility for long alpine rides
Typical configurations:
- 750 + 250 + 250 Wh
- 500 + 250 + 250 Wh
The 1250 Wh setup worked perfectly for:
- 2500–3000 m elevation days (Dolomites, Ticino)
- No charging required during the day
-

- Simplon Rapcon CX Race with Bosch Powermore
-

- Simplon Rapcon CX Race with Bosch Powermore
-

- Simplon Rapcon CX Race with Bosch Powermore
-

- Simplon Rapcon CX Race with Bosch Powermore
-

- Simplon Rapcon CX Race with 2x Bosch Powermore (1 for Backpack, 1 on Bike) and 750 Wh Battery
-

- Simplon Rapcon CX Race with 2x Bosch Powermore (1 for Backpack, 1 on Bike) and 750 Wh Battery
-

- Simplon Rapcon CX Race with 2x Bosch Powermore (1 for Backpack, 1 on Bike) and 2x 500 Wh Battery (it was a 3500 HM Ride)
-

- Simplon Rapcon CX Race with Bosch Powermore
-

- Simplon Rapcon CX Race with Bosch Powermore
-

- Bosch PowerMore Use
b) Light eMTB Reference (TQ System)
On my Simplon Rapcon TQ:
- 320 Wh internal
- 160 Wh range extender
- Total bike weight: 19.3 kg
The RE was integrated via a Fidlock interface (developed together with Fidlock Germany) and worked extremely well.
-

- Simplon Rapcon TQ
-

- Simplon Rapcon TQ with TQ RE
-

- Simplon Rapcon TQ lower Plug
-

- Simplon Rapcon TQ with RE and the excellent FidLock Mount
11. Conclusion
Overall: The AMFLOW PX is an outstanding bike and a clear step forward compared to the already strong PL Series.
-

- Navigation with the PX is easy and works with GPX Files well
-

- PX around Innsbruck
-

- PX around Innsbruck
-

- PX around Innsbruck
-

- PX around Innsbruck
-

- PX around Innsbruck
Congratulations to the AMFLOW and Avinox Team, they built and designed an outstanding Alpine Bike!
This Bike is another Game Changer, like the PL Series was. And we are not even talking about the PR Series!
The only one Topic where I think DJI has not yet understood what we want is the Range Extender solution. Volabike etc show what we want.
Since: Seriously? Routing the Cable BEHIND the Seattube to the Tire????
Why would I want to ride around with such a DIY solution? Come on Avinox, that can be done professionally – see my PowerMore or TQ examples above.
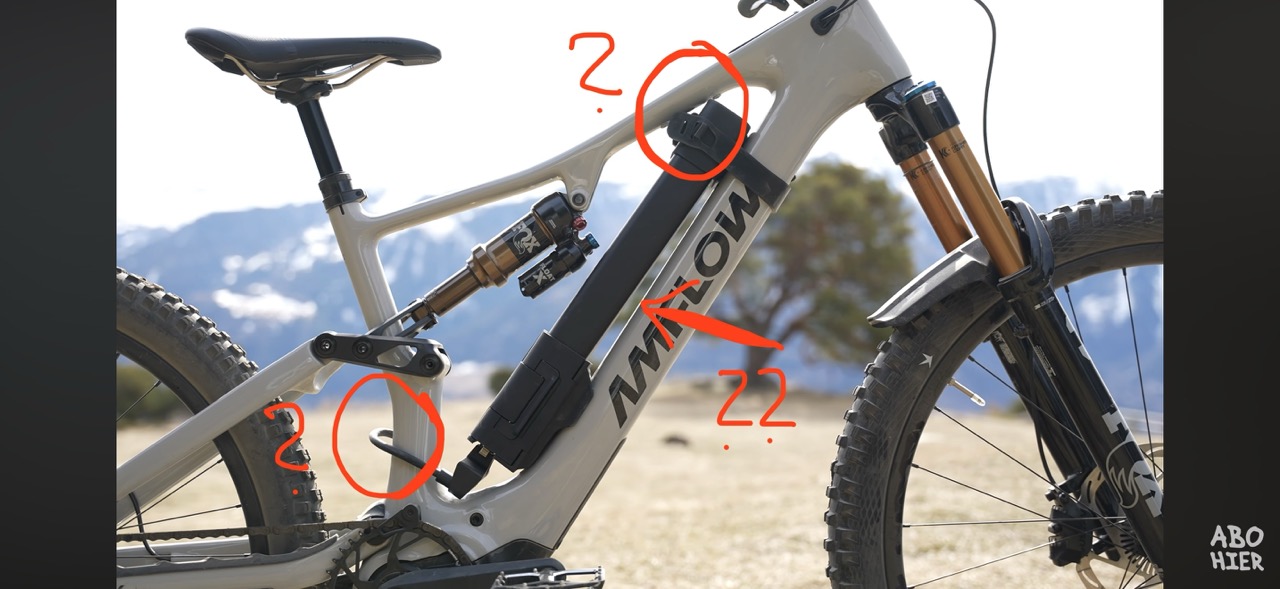
Image from Video by Toffer
More Details & Impressions coming soon…
Cheers
Christoph
About the Author:
Christoph Malin is an Austria-based eMTB rider, technical analyst, photographer, and filmmaker with over 30 years in the mountain bike industry.
He is a former test and technology editor at BIKE Magazine and led testing and laboratory operations at Mountain BIKE Magazine for over three years, including the transition from Munich to Stuttgart. He later served as Editor-in-Chief of Bike for Fun and contributed to publications such as MBUK.
Christoph has been deeply involved in consulting and R&D for the bicycle industry, including prototype evaluation and system validation. He was a Liteville factory rider and contributed to the development of models such as the 301, 601, and 901.
He founded and led the Proceed Vertrider Team, Liteville Vertrider Team, and SIMPLON eMTB Factory Team (2017–2023), acting as a technical interface between riders, brands, and development teams. He is also co-founder of the Austrian Alpine Club MTB national instructor team and contributed to MTB and eMTB training standards, as well as alpine trail projects such as the Nordkette Singletrail and the 11er/22er trails in the Stubai Valley.
His alpine guiding background was shaped from 2004 onwards with Atlantic Cycling on La Palma, where he also ran freeride camps. In 2015, he planned and produced one of the first eMTB freeride Alpencross projects for FREERIDE Magazine. He has been riding eMTBs since 2014.
Alongside his bike industry work, he produced scientific timelapse and film projects for ESO and CERN.
He has created complete eMTB test formats (concept, testing, writing, photo, video) for EMTB Magazine, Bergwelten, and eBike Sport News.
Since 2022, he works at Angelbird Technologies in test engineering and technical marketing, focusing on structured system validation and reproducible testing workflows.
With extensive high-alpine experience and over 195,000 vertical meters climbed in 2024 alone, his work combines real-world riding with an engineering-driven approach to evaluating modern eMTB systems.
The AMFLOW Avinox series sparked his interest in next-generation eMTB technology, and this AMFLOW PX review is intended as a focused deep-dive to provide the community with structured, in-depth insights beyond typical first impressions — while never losing sight of what matters most: riding these bikes is simply a lot of fun.
Selected moments from alpine riding, testing, production and science work at CERN and ESO:

- Somewhere at the Alps

- Riding my 601 at the Innsbruck Nordkette

- Dolomites sunset.

- I love Snowriding

- Back in the Days.

- In Chile with Stephane Guisard and Babak Tafreshi

- Hometrails

- Our classic Nightrides at Nordkette

- Ticino with some Snow

- South Tyrol

- Hiking my 601

- Flying the Inspire 2 at Foehn Winds

- I loved the Trek Remedy.

- At Work at ESO / Paranal site.

- At Work at ESO / Paranal site.

- At Work at ESO / ALMA site.

- At Work at ESO / ALMA site.

- At Work at CERN at the LHC / ATLAS.

- At Work at CERN at the LHC / ATLAS.

- At Roque de les Muchachos, La Palma.

- At Work at ESO / ALMA site.

- Biking under the Milky Way

- Winterbiking, I love it!

- Prototype Testing

- Bosch Datalogging

- Alpine 6K Drowne Inspire 2

- After Sunset. Inspire 2 is ready to go.

- ATLAS Timelapse Setup.

- Rigging…

- On Tour…
Comments are closed